Authentication Fundamentals

Introduction
Authentication in software engineering refers to the process of verifying the identity of a user, system, or entity to ensure that they are who they claim to be. It is a crucial aspect of security and is used to protect sensitive information, resources, and functionalities within a software system.
Given that majority of the systems are available to the public on the internet its important to protect the clients and our systems from malicious actors.
There are number of common techniques used for authentication and they’ve evolve over the years along with the internet. We’ll attempt to cover each of them in detail to better understand the fundamental concepts of authentication.
Password-based Authentication
1961: Passwords
By the early 1960s, some universities had a computer that was shared among all students for the use of performing calculations and research. Here is where the first form of digital authentication truly began.
MIT was one such school. Their big, slow, shared computer had multiple terminals. A program called the Compatible Time-Sharing System (CTSS) allowed students and researchers to share the computer. One student, Fernando J. Corbató, noticed that any user of the CTSS was able to access the files of any other user, and, unsurprisingly, viewed this as a fundamental weakness in the system.
In 1961, Corbató implemented a rudimentary password program for the CTSS. And by rudimentary we mean the system prompted the user for a password and then saved it into a plaintext file within the filesystem.
Passwords were a step in the right direction, but a user could easily find where the passwords were stored and access them. In fact, that’s exactly what happened when a PhD researcher named Allan Scherr wanted more than his allotted four-hour block on the MIT computer. His greed may have made him the first hacker.
Late 1960s: Password Encryption
By the late 1960s, programmers knew that storing passwords in plaintext wasn’t going to cut it. While working at Bell Labs, Morris made foundational contributions to Unix, including a password encryption scheme (based on work by Roger Needham) that determined hashes of passwords for user authentication. Essentially, the scheme used a key derivation function, which calculates a secret value that is easy to compute in one direction but extremely difficult to crack in the opposite direction.
Early 1970s: Asymmetric Cryptography
The next step in the journey to robust user authentication was asymmetric cryptography (also known as public-key cryptography). There are two keys — a public key and a private key. The public key is openly shared and acts as an identifier for the user. The private key is combined with the public key to create a digital signature, which authenticates the user.
The technology was kept strictly classified by the UK government until 1997 (well, strictly classified to the UK plus the NSA in the U.S.).
Mid-1980s: Dynamic Passwords
As technology quickly advanced, the fallibility of passwords became more and more obvious. Users would choose easily guessable passwords or reuse the same passwords in multiple places.
These passwords change based on variables, like location, time, or a physical password update (like a FOB). They remove any risk of replay attacks and solve the problem caused when users have the same password in many places. Security Dynamics Technologies, Inc. was the first company to create FOB hardware with a one-time password (OTP) for authentication.
Late 1990s: Public Key Infrastructure
Remember how we said that asymmetric cryptography was developed in the ‘70s but kept secret until 1997? Well, when the knowledge did finally go public, it was a game-changer.
By the 1990s, the Internet was no longer a tool hoarded by universities and governments. With so much sensitive data online, beefing up authentication to know exactly who was accessing what was a must.
In 1986, a handful of U.S. government agencies (including the NSA) and 12 companies with an interest in computers developed specs for secure network communications. It was originally named the SP4 protocol and eventually renamed the Transport Layer Security protocol (TLS). In the late ’90s, Taher Elgamal — an engineer at Netscape — developed the original Secure Sockets Layer (SSL) protocol, which included keys and server authentication.
Session-based & Cookie-based Authentication
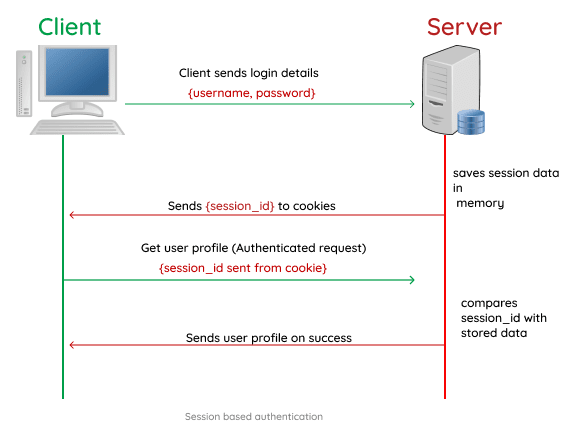
History
The origin of session-based authentication can be traced back to the early days of the World Wide Web in the mid-1990s.
The initial approach to session-based authentication was based on the concept of using server-side sessions and HTTP cookies. Here’s a brief overview of its development:
Netscape’s Proposal: In 1994, Netscape Communications Corporation, a pioneer in web browser development, introduced HTTP cookies as a solution to enable stateful interactions on the stateless HTTP protocol. Cookies were initially designed to store small pieces of data on the client-side (browser) that could be sent back to the server with each request. The idea was to use cookies to maintain user state and session information, effectively enabling session-based authentication.
In response to this need, Lou Montulli, an engineer at Netscape, came up with the idea of using small pieces of data stored on the client-side (user’s browser) to maintain user state. He called these small pieces of data “cookies,” inspired by the phrase “magic cookie” from UNIX computing, which referred to a piece of data passed between programs.
Netscape Navigator 2.0: Netscape Navigator 2.0, released in 1995, was one of the first web browsers to support HTTP cookies. With this release, developers could use cookies to create sessions and track user activity across multiple web pages.
RFC 2109 and Standardization: In February 1997, the Internet Engineering Task Force (IETF) published RFC 2109, which defined the standards for HTTP cookies. The RFC provided guidelines for how cookies should be created, stored, and managed, thereby standardizing the way session-based authentication was implemented across different web servers and browsers.
Widespread Adoption: Following the standardization of HTTP cookies, major web browsers and web servers quickly adopted the new mechanism. This widespread acceptance allowed developers to rely on cookies for session-based authentication and user state management.
Risks
While session-based authentication served its purpose effectively, it also presented security challenges, such as session hijacking and cross-site scripting (XSS) attacks. However, cookies and session-based authentication continue to be used extensively in web development, especially for applications that require stateful interactions.
Differentiation
Storage Location:
- Cookie-Based Authentication: In cookie-based authentication, the user’s authentication credentials (usually a session identifier or token) are stored as small pieces of data called cookies on the client-side (user’s browser). These cookies are sent with each HTTP request, allowing the server to identify and authenticate the user on subsequent interactions.
- Session-Based Authentication: In session-based authentication, the user’s authentication information is stored on the server-side. The server creates a session for each authenticated user and assigns a unique identifier (session ID) to that session. The session ID is usually stored in a cookie on the client-side, but it only contains a reference to the session data stored on the server.
Data Storage:
- Cookie-Based Authentication: Cookies typically contain only a unique session identifier or an authentication token. The actual user data and authentication details are stored on the server.
- Session-Based Authentication: In session-based authentication, the server stores the user’s authentication details and other relevant session data. The session data may include information about the user’s identity, permissions, and any other session-related information.
Security:
- Cookie-Based Authentication: Since cookies are stored on the client-side, they are susceptible to certain security risks. For instance, if an attacker gains access to the cookie data (e.g., via XSS), they could impersonate the user and perform malicious actions.
- Session-Based Authentication: Session-based authentication, particularly when implemented securely, can be considered more robust from a security perspective. The sensitive authentication data is stored on the server-side, reducing the risk of unauthorized access by attackers.
User Interaction:
- Cookie-Based Authentication: With cookie-based authentication, the client (user’s browser) sends the session identifier or token with each request. This allows the server to identify the user without the need for additional server-side storage of session information.
- Session-Based Authentication: In session-based authentication, the server maintains session information on the server-side, which requires some server resources to handle session data for each active user. This means that session-based authentication may be more resource-intensive on the server.
Lifespan and Expiry:
- Cookie-Based Authentication: Cookies can have a specified expiration time, which means they can persist even after the user closes the browser and revisit the site later.
- Session-Based Authentication: Sessions are typically short-lived and can expire after a certain period of inactivity or based on a predetermined time limit set by the server. Once the session expires, the user needs to re-authenticate.
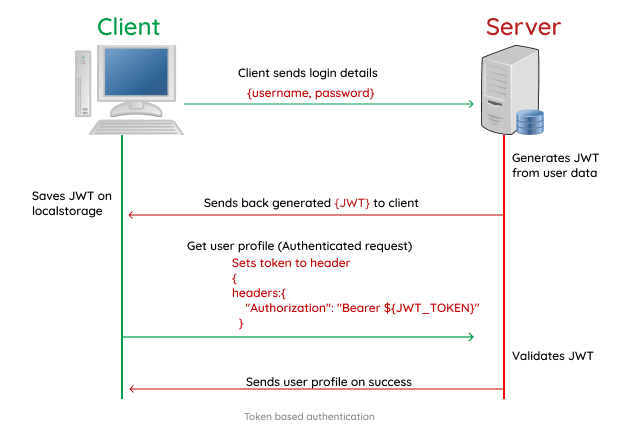
Token-based Authentication
History
Token-based authentication emerged as an evolution of session-based authentication and became more prominent in the late 2000s and early 2010s. The concept of using tokens for authentication and authorization has its roots in various authentication protocols and security practices. Here’s a timeline of its development:
Session-Based Authentication and Cookies: As mentioned earlier, in the mid-1990s, session-based authentication using cookies became the prevalent method for managing user sessions and authentication on the web. While cookies were widely adopted and worked well for many scenarios, they had some limitations, including security vulnerabilities like CSRF attacks and XSS.
XML Web Services and WS-Security: In the early 2000s, with the rise of XML-based web services and the Web Services Security (WS-Security) standard, tokens started gaining attention as a means of providing security credentials in web service calls. WS-Security used XML-based security tokens for authentication and authorization in SOAP-based web services.
OAuth 1.0: In December 2007, OAuth 1.0 was introduced as an open standard for secure API authorization. OAuth allowed third-party applications to access resources on behalf of users without requiring the user’s credentials to be shared with the third-party app. OAuth 1.0 used tokens to represent access rights, and the access tokens served as temporary credentials for authorized access.
JSON Web Tokens (JWT): JWT, defined in RFC 7519, was introduced in May 2015 as a more lightweight and efficient alternative to traditional session-based authentication and OAuth 1.0. JWT is a compact and self-contained way of representing information between two parties as a JSON object. It can be digitally signed and optionally encrypted for security.
Differentiation
Key differentiation of token authentication and session based authentication is the following:
The token itself contains all the necessary authentication data, including user identity and access permissions. Servers do not need to store session information since all relevant data is encoded within the token.
However, token signatures can be validated on the server to ensure authenticity and integrity.
Tokens can be designed to be secure through the use of cryptographic algorithms, ensuring that they cannot be tampered with by clients.
JWTs, for example, can be digitally signed and encrypted to protect the data integrity and confidentiality.
Token-based authentication is inherently stateless, as the server does not need to keep track of user sessions. Each request from the client contains all the necessary information for authentication and authorization.
OAuth Authentication
The OAuth authentication process typically involves the following entities:
Resource Owner: The resource owner is the end-user, the individual who owns the resources that the third-party application wants to access. The resource owner grants authorization to the third-party application to access their resources.
Client (Third-Party Application): The client is the third-party application or service that wants to access the resource owner’s resources. The client needs to obtain authorization from the resource owner to access these resources.
Authorization Server: The authorization server is responsible for authenticating the resource owner and issuing access tokens. It verifies the resource owner’s identity and grants the client limited access to the requested resources.
Resource Server: The resource server is the server that hosts the protected resources (e.g., user data) of the resource owner. It requires an access token to grant access to these resources.
Access Token: The access token is a credential that represents the authorization granted to the client by the resource owner. The client uses the access token to access the resource server and retrieve the protected resources.
OAuth 1.0
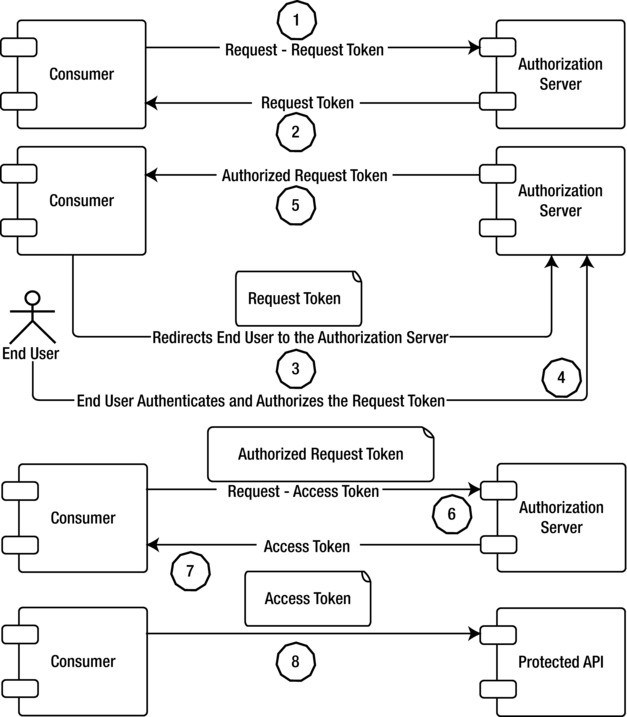
Here’s a step-by-step overview of the OAuth 1.0a flow:
Client Registration: The client (third-party application) registers itself with the service provider (resource server) and obtains a consumer key and consumer secret. These are used to authenticate the client with the service provider.
Temporary Credential Request (Request Token): The client initiates the OAuth flow by sending a request to the service provider’s request token endpoint. The request includes the following parameters:
oauth_consumer_key: The client’s consumer key.oauth_signature_method: The signature method used by the client to sign the request (e.g., HMAC-SHA1).oauth_timestamp: A timestamp indicating when the request is made.oauth_nonce: A unique nonce value for each request to prevent replay attacks.oauth_version: The OAuth version used (1.0).oauth_callback: The URL to which the service provider will redirect the user after authentication.
Temporary Credential Issuance: The service provider validates the request and issues temporary credentials (request token) to the client. The client receives the request token and request token secret.
User Authentication and Consent: The client redirects the resource owner (user) to the service provider’s user authentication page, passing the request token as a query parameter. The user is prompted to log in and provide consent for the client to access their resources.
User Authorization: After successful authentication and consent, the user is redirected back to the client’s callback URL with the verifier code as a query parameter.
Token Request (Access Token): The client makes a request to the service provider’s access token endpoint to exchange the request token and the verifier code for an access token. The request includes the following parameters:
oauth_consumer_key: The client’s consumer key.oauth_token: The request token received in the previous step.oauth_signature_method: The same signature method used in the temporary credential request.oauth_timestamp: A new timestamp for this request.oauth_nonce: A new unique nonce value for this request.oauth_version: The OAuth version used (1.0).oauth_verifier: The verifier code received from the user.
Access Token Issuance: The service provider validates the request, verifies the temporary credentials and verifier code, and issues an access token to the client. The client receives the access token and access token secret.
Accessing Protected Resources: The client can now use the access token to sign requests and access protected resources on behalf of the user.
OAuth 2.0
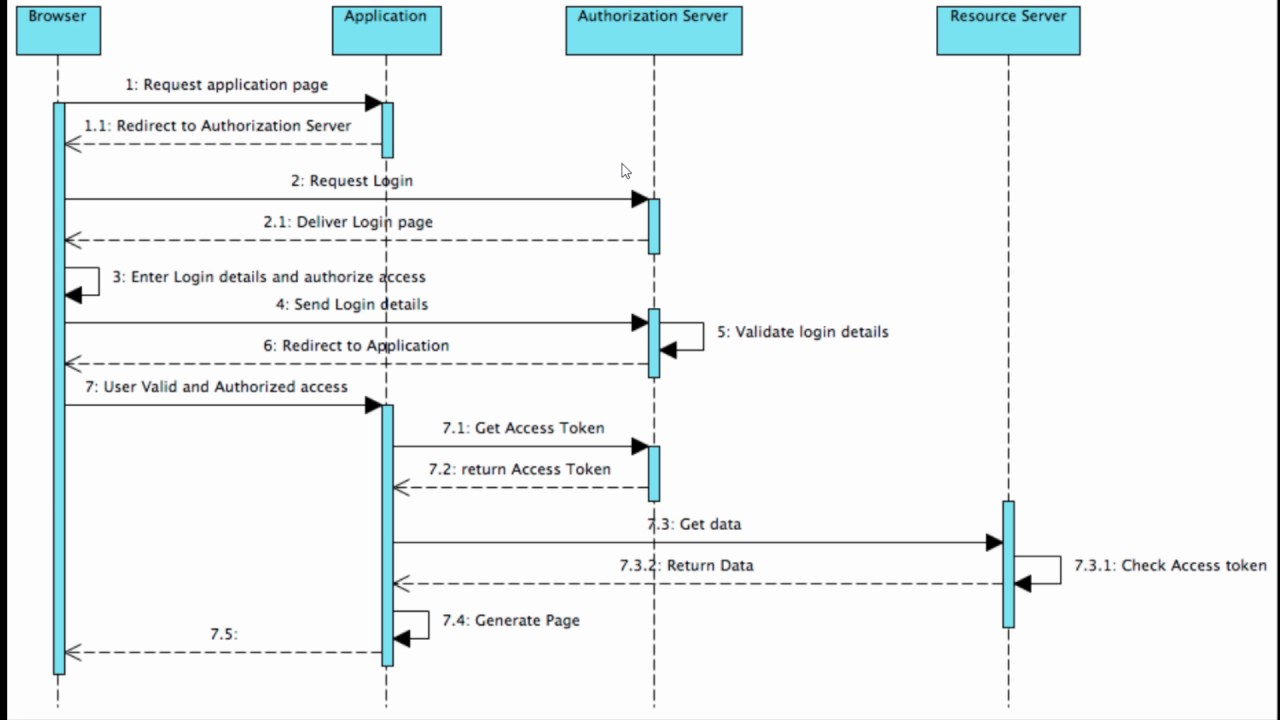
Here’s a step-by-step overview of the Authorization Code Grant flow:
Client Registration: The client (third-party application) registers itself with the authorization server. During registration, the client is assigned a unique client identifier and, in some cases, a client secret, which is used to authenticate the client with the authorization server.
Authorization Request: The client initiates the OAuth flow by redirecting the resource owner (user) to the authorization server’s authorization endpoint. The client includes the following parameters in the request:
response_type: Set to “code” to indicate the Authorization Code Grant flow.client_id: The client identifier assigned during client registration.redirect_uri: The URI to which the authorization server will send the authorization code after user consent (must be pre-registered with the client).scope: The requested scope, representing the resources the client wants to access.
User Authentication and Consent: The resource owner is prompted to log in to the authorization server and provide their consent to grant the client access to their resources. The authorization server may ask the user to approve the requested scope.
Authorization Code Generation: Upon successful authentication and consent, the authorization server generates an authorization code and sends it back to the client’s registered redirect URI as a query parameter.
Token Request: The client, now in possession of the authorization code, makes a POST request to the authorization server’s token endpoint to exchange the authorization code for an access token. The client includes the following parameters in the request:
grant_type: Set to “authorization_code” to indicate the use of the Authorization Code Grant flow.code: The authorization code received from the authorization server.redirect_uri: The same redirect URI used in the authorization request.client_id: The client identifier assigned during client registration.client_secret: (Optional) The client secret, if required by the authorization server.
Access Token Issuance: The authorization server validates the authorization code and, if valid, issues an access token to the client in the response.
Accessing Protected Resources: The client can now use the access token to make requests to the resource server’s protected endpoints on behalf of the user and retrieve the authorized resources.
OAuth 1.0 vs OAuth 2.0
Here are the key differences between OAuth 1.0 and OAuth 2.0:
Complexity:
- OAuth 1.0: OAuth 1.0 is more complex than OAuth 2.0. It involves multiple steps, requires cryptographic signatures for each request, and uses temporary tokens (request token and access token) for user authentication.
- OAuth 2.0: OAuth 2.0 is designed to be simpler and more developer-friendly. It streamlines the flow and reduces the number of steps, making it easier to implement.
Token Usage:
- OAuth 1.0: In OAuth 1.0, the client uses two types of tokens, the temporary request token for initiating the flow and the access token for accessing protected resources. The tokens are used in every request to the server, along with cryptographic signatures, to verify the authenticity of the request.
- OAuth 2.0: OAuth 2.0 uses only one type of token, the access token. The access token is used for accessing protected resources and does not require cryptographic signatures for each request. OAuth 2.0 relies on HTTPS for secure communication.
Security:
- OAuth 1.0: OAuth 1.0 provides good security through the use of cryptographic signatures and nonces. However, it is more susceptible to certain types of attacks, such as replay attacks, due to its complexity.
- OAuth 2.0: OAuth 2.0 improves security by relying on HTTPS for secure communication and using access tokens with shorter lifetimes. It addresses some security issues present in OAuth 1.0, such as the removal of the complex cryptographic signature requirement for each request.
Client Authentication:
- OAuth 1.0: In OAuth 1.0, client authentication is done using client credentials and a client secret (shared secret) during the token exchange process.
- OAuth 2.0: OAuth 2.0 introduces different methods for client authentication, including the use of a client secret, client ID and secret combined, or public key-based authentication.
Scopes and Refresh Tokens:
- OAuth 1.0: OAuth 1.0 does not have standardized support for scopes (access rights) or refresh tokens. The scope of access is typically pre-arranged between the client and server.
- OAuth 2.0: OAuth 2.0 introduces standardized support for scopes, allowing clients to request specific access rights. It also supports refresh tokens that can be used to obtain new access tokens without requiring the user to reauthenticate.
Mobile and Native App Support:
- OAuth 1.0: OAuth 1.0 does not work well with mobile and native apps because of the complexity of the token flow and the need for cryptographic signatures.
- OAuth 2.0: OAuth 2.0 introduces specific grant types (such as the Authorization Code with PKCE) that are more suitable for mobile and native apps, addressing the limitations of OAuth 1.0.
Claims-based Authentication
Claims-based authentication is a method of authentication where identity information is represented as claims in a token or assertion. Each claim is a statement about a user’s identity or attributes, such as user ID, name, email address, role, group membership, and other relevant information.
OAuth 2.0
OAuth is a token-based framework that focuses on granting access to resources, while the format of the tokens (access tokens, refresh tokens, or any other type of token) and whether they are claims-based depends on the specific implementation or token type chosen for the OAuth flow.
JWTs, a popular choice for access tokens in OAuth 2.0, are an example of claims-based tokens, but other token formats are also used in practice.
JSON Web Tokens (JWT)
JWT is a token format used for securely representing claims
JWT is a compact, URL-safe token format used to securely transmit information between two parties. JWTs are commonly used to represent claims between a client and a server in a stateless manner. The claims are statements about an entity (typically, the user) and additional data, such as user identity, authentication status, or access permissions.
The key features of JWT that contributed to its popularity are:
Self-contained: A JWT contains all the necessary information about the user and their authentication details. This reduces the need for server-side storage, making it scalable and suitable for stateless architectures.
Stateless: Unlike traditional session-based authentication, where the server needs to maintain session state, JWT-based authentication is stateless. The server can validate and authenticate the user based solely on the information contained within the token.
Flexibility: JWTs can carry custom claims (additional information) beyond standard authentication data. This flexibility makes JWTs versatile for various use cases, including user authentication and authorization in web applications and APIs.
JWT quickly gained popularity in the development community due to its simplicity, ease of implementation, and security features. It became widely used in modern web applications and RESTful APIs, contributing to the shift towards token-based authentication as a preferred method for managing user sessions and secure access to resources.
OpenID Connect (OIDC) Authentication
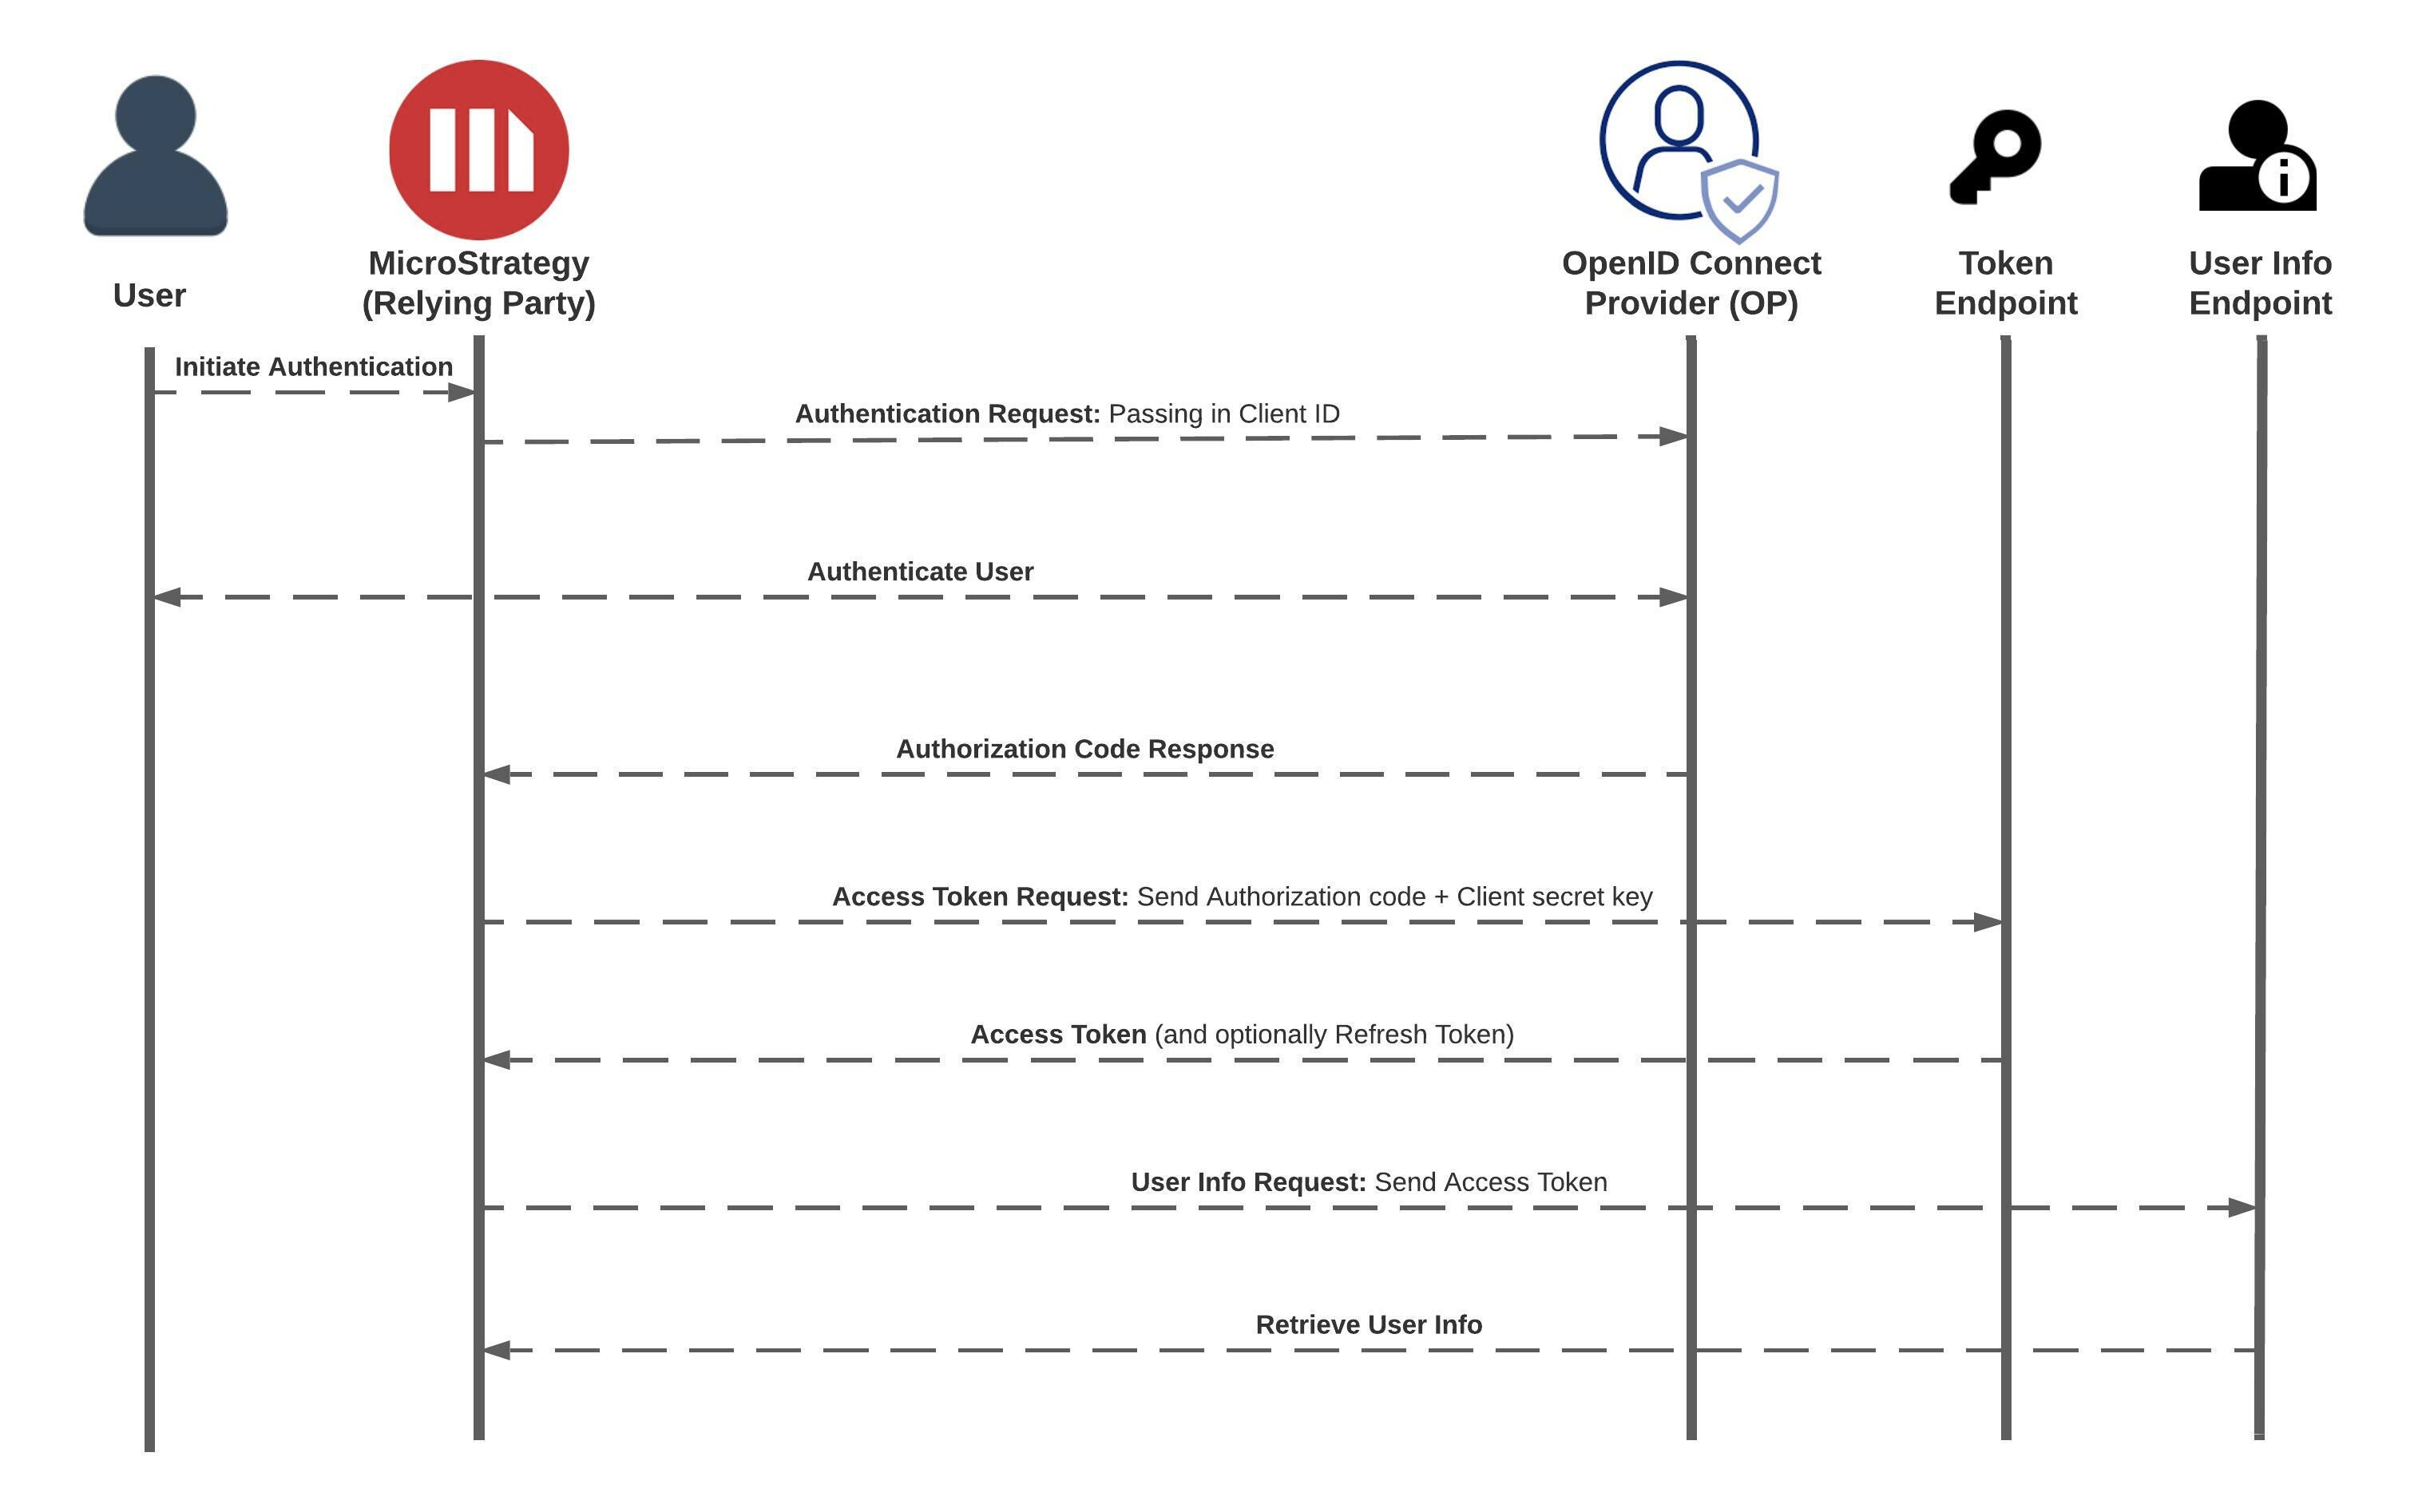
OpenID Connect is an authentication layer built on top of the OAuth 2.0 framework, specifically designed for identity and user authentication. It provides a standardized way for clients (Relying Parties) to verify the identity of end-users (Resource Owners) based on the authentication performed by an Identity Provider (OP). Here’s an overview of the OpenID Connect flow:
Client Registration: The client (Relying Party) registers itself with the Identity Provider (OP) by providing information about its identity, such as client ID and client secret (if applicable). The OP issues client credentials that the client uses to authenticate itself when communicating with the OP.
Authorization Request: When the user attempts to log in to the client application, the client initiates the OpenID Connect flow by redirecting the user to the OP’s authorization endpoint. The client includes the following parameters in the request:
response_type: Set to “code” to indicate that the Authorization Code flow will be used.client_id: The client identifier assigned during client registration.redirect_uri: The URL to which the OP will redirect the user after authentication.scope: The requested scope, which includes the “openid” scope indicating that the request is an OpenID Connect request.state: A random value used to protect against CSRF attacks.nonce: A random value used to mitigate replay attacks.
User Authentication and Consent: The user is redirected to the OP’s authentication page, where they log in and consent to sharing their identity information with the client. The user’s consent may include the specific claims that the client can access.
Authorization Code Generation: After successful authentication and consent, the OP generates an authorization code and redirects the user back to the client’s redirect URI, along with the authorization code and the state parameter.
Token Request: The client makes a backend POST request to the OP’s token endpoint to exchange the authorization code for an ID token and optionally an access token and a refresh token. The request includes the following parameters:
grant_type: Set to “authorization_code” to indicate the use of the Authorization Code flow.code: The authorization code received from the OP.redirect_uri: The same redirect URI used in the authorization request.client_id: The client identifier assigned during client registration.client_secret: The client secret to authenticate the client with the OP.
ID Token Validation: The client validates the ID token’s signature and claims to ensure that it is genuine and belongs to the user who authenticated with the OP.
User Access to the Client: The client grants access to the user based on the verified identity information in the ID token.
OIDC vs OAuth
The main difference between OAuth2 and OpenID Connect is that OAuth2 is only concerned with authorization, while OpenID Connect is also concerned with authentication.
Authorization means granting access to resources, while authentication means verifying the identity of a user.
OAuth2 does not provide a standard way to obtain user information, while OpenID Connect does. OAuth2 relies on access tokens, which are opaque strings that can only be validated by the resource server, while OpenID Connect relies on ID tokens, which are self-contained and can be validated by the client.
Single-Sign On (SSO)
Single Sign-On (SSO) is a mechanism that allows users to access multiple applications or services with a single set of login credentials, eliminating the need for users to remember multiple usernames and passwords for different systems. The SSO flow involves the following steps:
User Authentication Request: When the user tries to access an application or service that supports SSO, they are redirected to the Identity Provider (IDP) or the SSO system. The application includes a request for authentication.
User Authentication: At the Identity Provider, the user is prompted to log in and provide their credentials (e.g., username and password). The IDP verifies the user’s identity and authentication credentials.
SSO Token Generation: If the user’s credentials are valid, the Identity Provider generates a security token or assertion, which contains information about the user’s identity and authentication status. This token is digitally signed to ensure its integrity.
Token Exchange: The Identity Provider sends the security token back to the requesting application (Service Provider or SP) via a secure channel.
User Access to Service Provider: The Service Provider validates the security token received from the Identity Provider. If the token is valid and the user is authenticated, the Service Provider grants access to the user, and the user is logged into the application without the need to enter separate login credentials.
Token Validation and Renewal (Optional): Some SSO systems support token validation and renewal to maintain user sessions. The Service Provider can periodically check with the Identity Provider to ensure the token’s validity and refresh it if necessary, without requiring the user to re-authenticate.
SSO can be implemented using various protocols and technologies, such as SAML (Security Assertion Markup Language), OAuth 2.0, OpenID Connect, and CAS (Central Authentication Service). Each protocol has its features and use cases, but they all aim to achieve the goal of providing a seamless and secure user experience across multiple applications through a single authentication event.
SAML Authentication
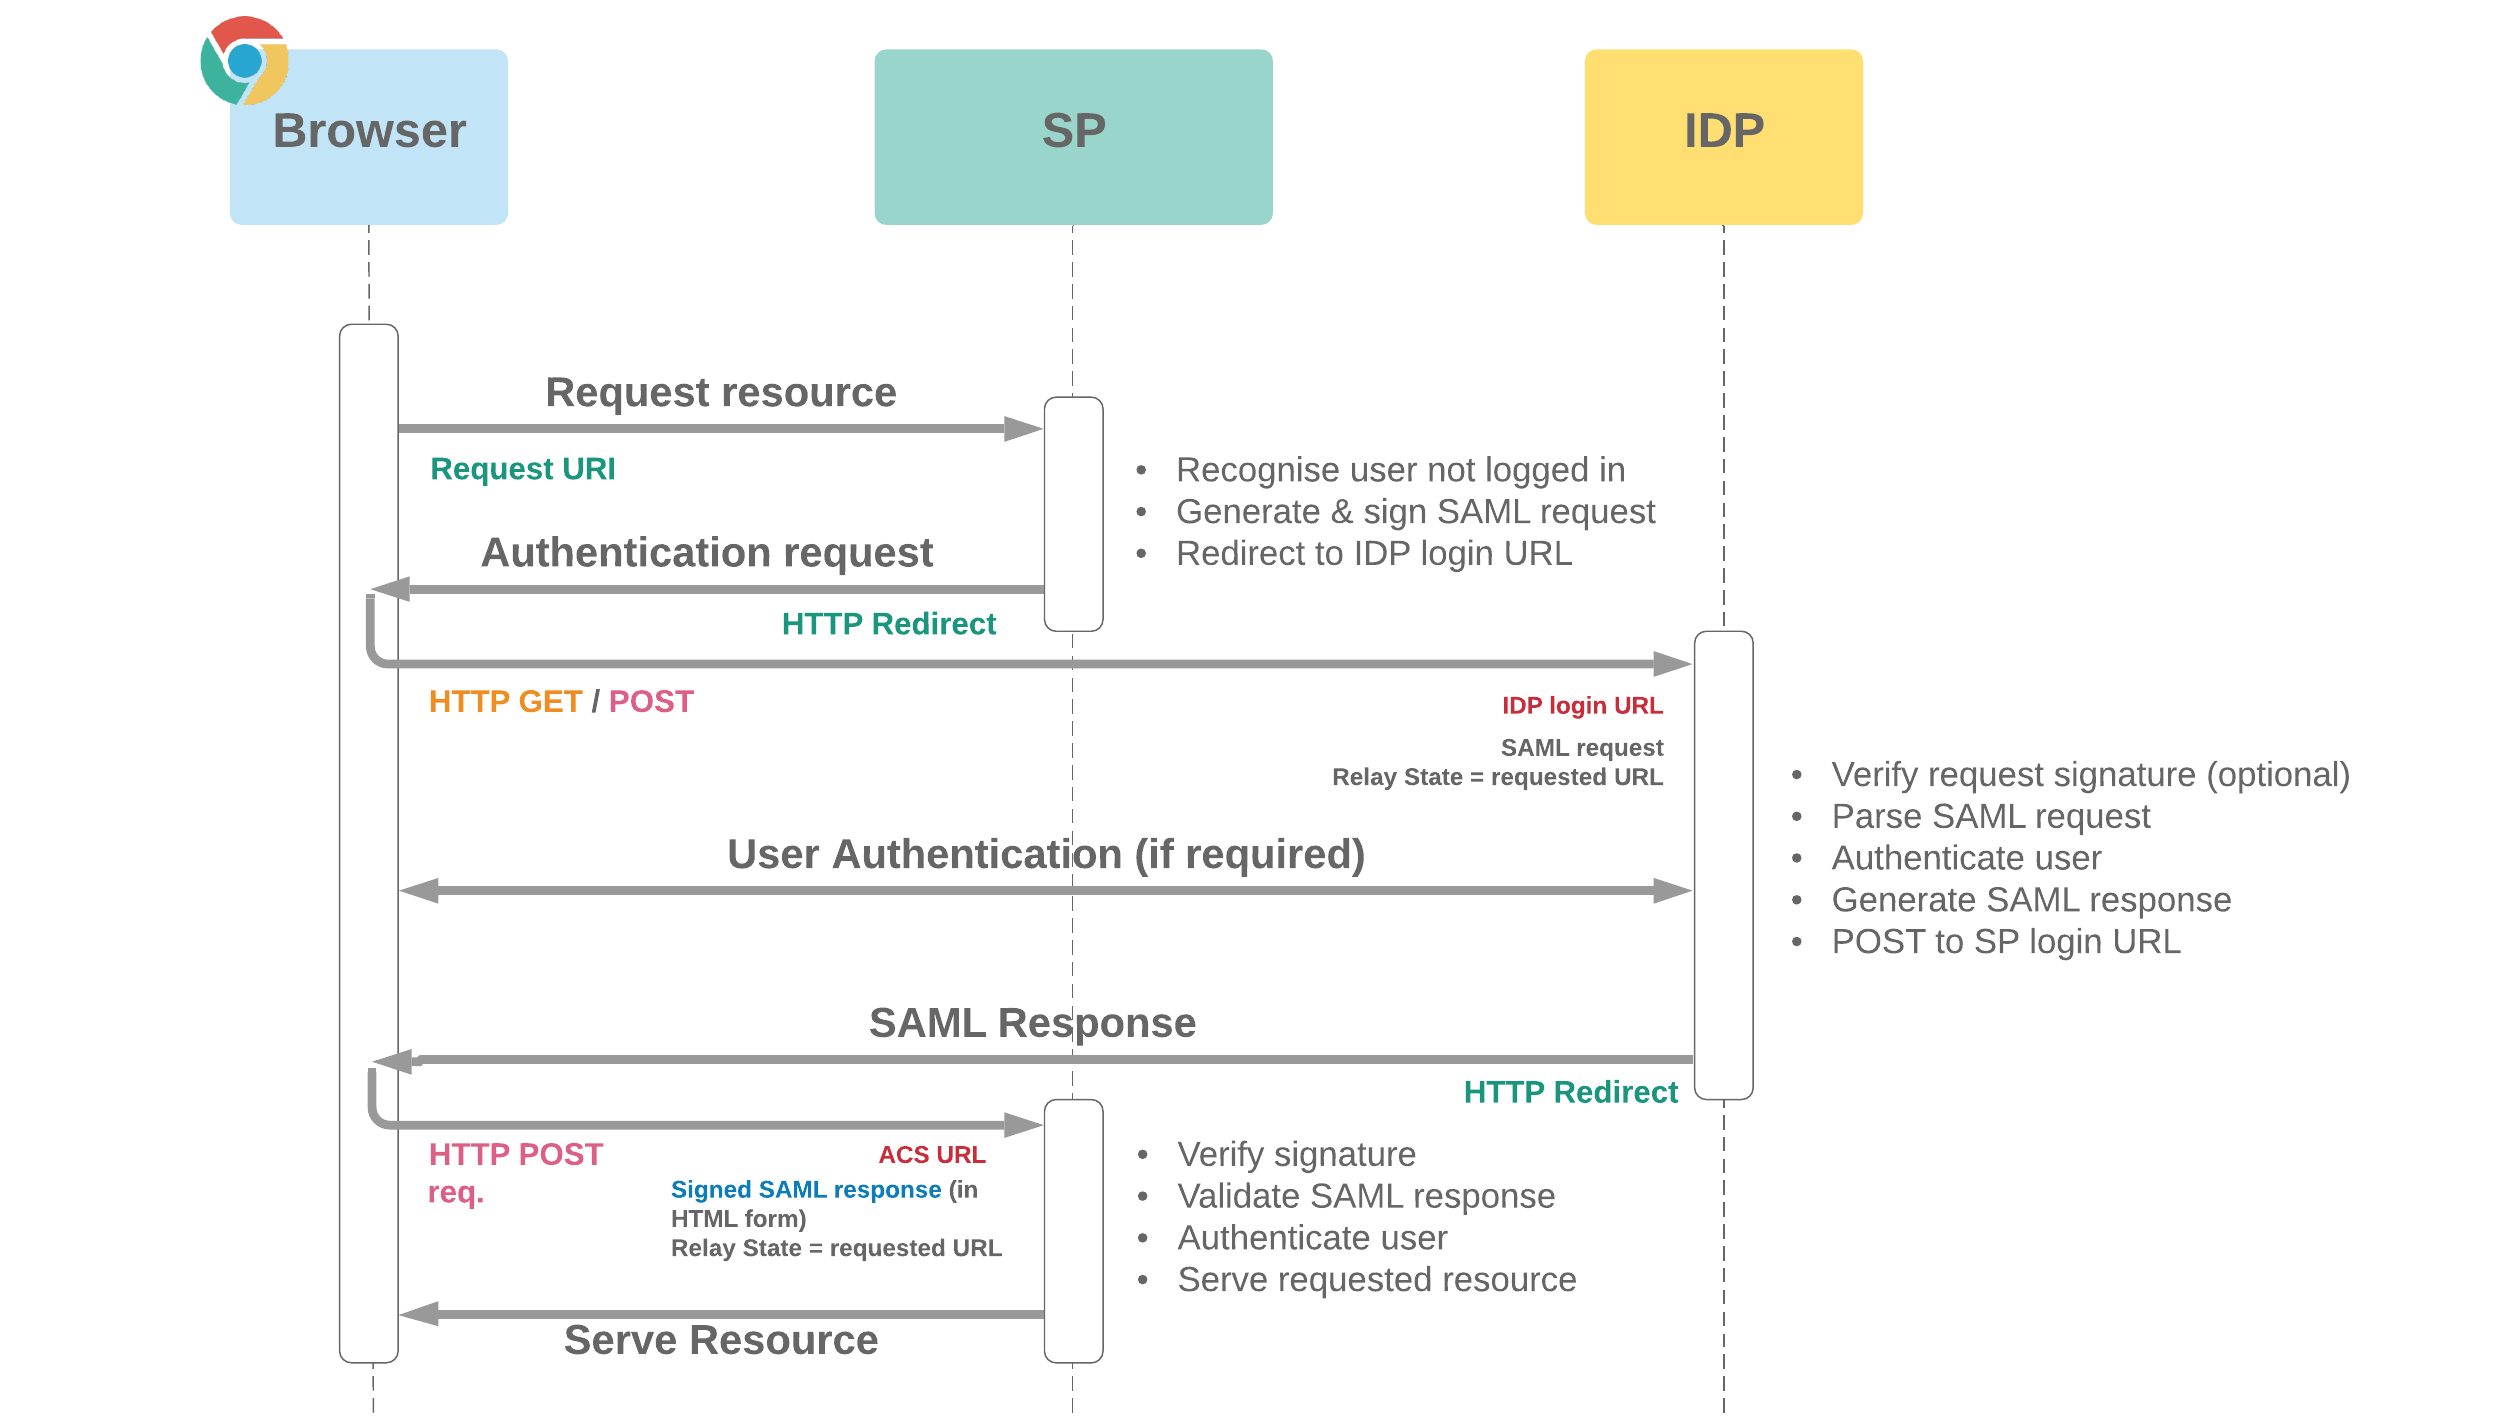
The Security Assertion Markup Language (SAML) is an XML-based standard used for exchanging authentication and authorization data between identity providers (IdP) and service providers (SP). SAML enables Single Sign-On (SSO) and federated identity management. Here’s an overview of the SAML SSO flow:
SP Initiated SSO:
- The user attempts to access a resource (protected application) on the Service Provider (SP).
- Since the user is not authenticated, the SP redirects the user to the Identity Provider (IdP) with a SAML authentication request.
- The authentication request includes the following:
SAMLRequest: The encoded SAML request containing information about the SP and the requested authentication context.RelayState: An optional parameter to maintain state between the SP and the IdP, which can be used to redirect the user back to the originally requested resource after authentication.
IdP Initiated SSO:
- The user accesses the IdP directly or through an IdP discovery page.
- The IdP identifies the user and presents an application selection page or the user’s home page.
- The user selects the desired application (SP) from the list of available applications.
- The IdP generates a SAML assertion containing authentication information and sends it to the selected SP.
- The assertion is typically sent via an HTTP POST request to the SP’s Assertion Consumer Service (ACS) URL.
Authentication at IdP:
- The IdP authenticates the user using its own authentication methods, such as username/password, multi-factor authentication, or single sign-on to a corporate network.
- Once the user is authenticated, the IdP generates a SAML assertion (also known as the SAML response) containing information about the user’s identity, attributes, and authentication status.
SAML Assertion Delivery:
- In SP-initiated SSO, the IdP sends the SAML assertion back to the SP in response to the authentication request.
- In IdP-initiated SSO, the IdP sends the SAML assertion directly to the SP after the user selects the application.
Assertion Validation and User Access:
- The SP validates the SAML assertion’s signature and ensures that it is issued by a trusted IdP.
- The SP checks if the user exists in its system based on the information in the assertion.
- If the user is recognized and authorized, the SP grants access to the requested resource or application, and the user is logged in.
Biometric Authentication
With the proliferation of mobile devices, biometric authentication methods like fingerprint and facial recognition have been integrated into session-based authentication, adding an extra layer of security and convenience for users.
Passwordless Authentication
In an effort to reduce the reliance on passwords (which can be weak and susceptible to breaches), passwordless authentication methods have gained popularity. These methods include using one-time codes, biometrics, or hardware-based security keys for authentication.
Reference
- https://workos.com/blog/a-developers-history-of-authentication
- https://lumochift.org/blog/understanding-auth
- https://chat.openai.com/